 Save
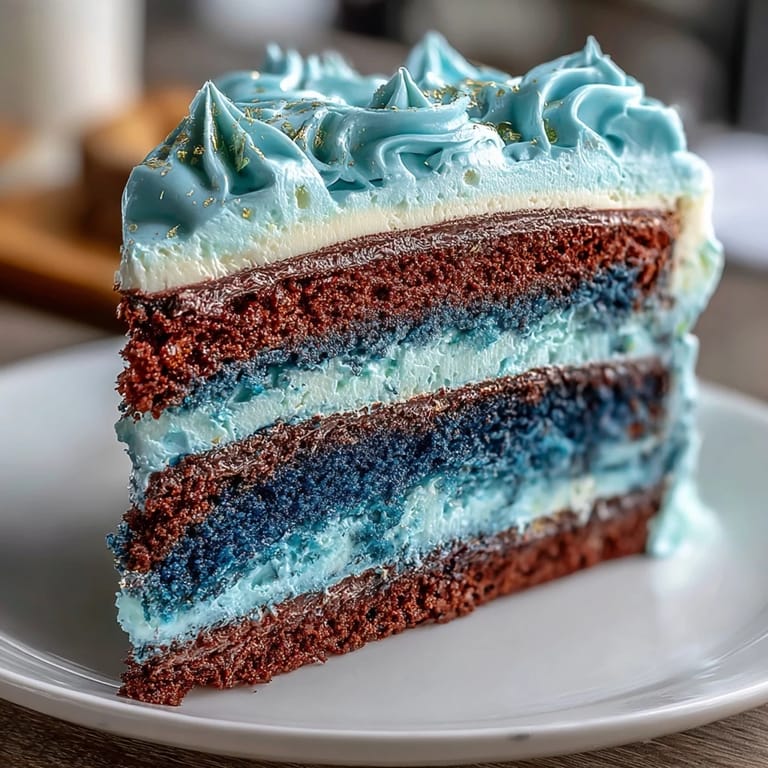
Save The first time I attempted this graduation cake, the kitchen was filled with bursts of laughter and the slightly nervous energy of celebration prep. I remember the sound of my electric mixer whirring over the chatter about school memories and future adventures. Blue dye smeared my fingertips and the air was sweet with vanilla as I adjusted the layers from pale to deep navy. Not every ombre swirl turned out perfect, yet the cake's bold color and shimmer managed to steal the show. Even just mixing the shades, I could feel the anticipation build for that big moment.
Baking this for a close friend's graduation, I learned how quickly a kitchen can transform into a gathering place—plates clattering, people sneaking tastes of frosting, someone always asking if they can help with the gold leaf. Halfway through decorating, my hands shaky with excitement, we decided to add extra gold streaks for luck. The final cake became a centerpiece, sparking arm-in-arm photos and jokes about blue teeth. That night, nobody noticed the slightly crooked layers—just the celebration.
Ingredients
- All-purpose flour: Measured with a spoon and leveled for light, fluffy cake; always sift to prevent lumps.
- Baking powder & baking soda: Ensures a high rise and tender crumb, but always double-check they're fresh for best results.
- Unsalted butter: Room temperature butter blends better into batter and creates creamy textures—soft but not melty is key.
- Granulated sugar: Gives structure and sweetness; beating long enough lightens the cake.
- Eggs: Room temperature eggs incorporate smoothly and add richness; crack them individually to avoid shell mishaps.
- Pure vanilla extract: The scent alone signals celebration; use real vanilla for depth rather than imitation.
- Whole milk: Room temperature helps batter blend evenly; if too cold, the mixture can split.
- Blue gel food coloring (navy, royal, light blue): Start with a little and build up slowly for a gradient—it's easier to add than remove.
- Powdered sugar: Sift before mixing to avoid lumps and ensure the buttercream is silken smooth.
- Milk or cream: Adjust the quantity for spreadability—too little makes the buttercream stiff, too much and it won't hold shape.
- Edible gold leaf or gold dust: Handle with dry hands and patience; tiny bits add elegance and drama without overwhelming the flavor.
- Clear alcohol (vodka or lemon extract): Needed for mixing gold dust and painting the gold—use sparingly and evaporate fully for safety.
Tired of Takeout? 🥡
Get 10 meals you can make faster than delivery arrives. Seriously.
One email. No spam. Unsubscribe anytime.
Instructions
- Pan Prep & Oven Warm-up:
- Grease and line three cake pans with parchment so the layers release cleanly—there's no joy in stuck cake. Preheat to 350°F while you gather ingredients; it sets the mood for baking.
- Dry Ingredients Blend:
- Whisk flour, baking powder, baking soda, and salt until they're airy and even—sometimes I shake the bowl just for luck. Ensures no surprise bitter spots.
- Creaming Butter & Sugar:
- Beat butter and sugar until pale and fluffy, about four minutes, listening for the change in beat. It feels almost magical watching the transformation.
- Add Eggs & Vanilla:
- Crack eggs one at a time into the mix, scraping the sides as needed to keep things even; add vanilla and inhale deeply—it always lifts spirits. This step adds richness and depth.
- Combine Wet & Dry:
- Alternate adding flour mixture and milk, beginning and ending with flour, mixing just until you stop seeing streaks. Overmixing makes the cake dense, so keep an eye out.
- Divide & Tint Batter:
- Split the batter in three bowls and tint each with increasing darkness—sometimes I swirl and check the hue against natural light to be sure. Getting the gradient right is half the fun.
- Bake Layers:
- Pour batters into pans and gently smooth the tops; bake until a toothpick tests clean, about 25–30 minutes, then cool on racks so each layer remains moist. The kitchen fills with a sweet warmth while they bake.
- Mix Buttercream:
- Beat butter until creamy, then slowly add powdered sugar; mix in vanilla, salt, and just enough milk to achieve soft peaks. Sift sugar for silkiness—trust me, it makes a difference.
- Color the Frosting:
- Reserve a cup for crumb coating and tint the rest dark blue. Play with lighter tones if you like—layering frosting feels like painting.
- Assemble Cake:
- Level the cooled cakes, stack darkest on bottom, spreading buttercream between layers; adjust if needed, cake can be forgiving. Make sure each layer is centered for clean lines.
- Crumb Coat & Chill:
- Spread a thin crumb coat and chill for twenty minutes; it makes final frosting smoother and catches stray crumbs. This break is good for kitchen cleanup.
- Final Frosting & Ombre Effect:
- Frost with dark blue buttercream, blending lighter shades toward the top for subtle ombre. Smooth with a spatula, rotating the cake for even edges.
- Gold Accents:
- Gently press gold leaf or paint gold dust where desired—don't overthink it, scattered touches always feel celebratory. Let your creativity shine here.
- Chill & Serve:
- Keep the cake chilled until just before serving so the colors and gold details stay crisp. Slice and enjoy with friends (blue teeth optional).
 Save
Save One afternoon, after the final gold streaks were applied, I caught a graduate tracing his initials into the soft buttercream with a fork—grinning with pride. The cake, once just batter and color, became a backdrop for hugs, laughter, and a snapshot that still sits on my fridge. Sometimes, the best celebration moments happen over dessert, even when the kitchen is still a bit messy.
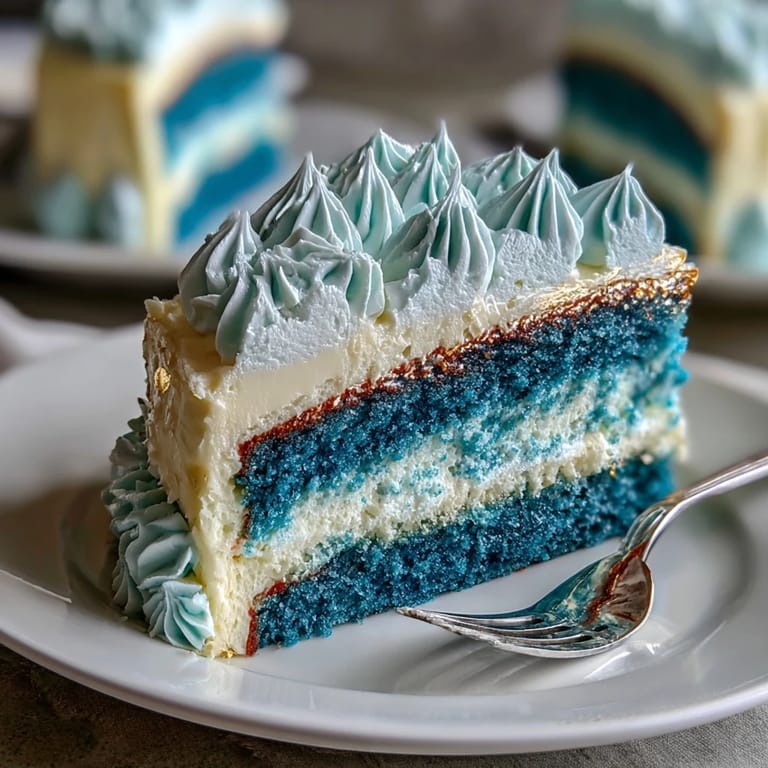
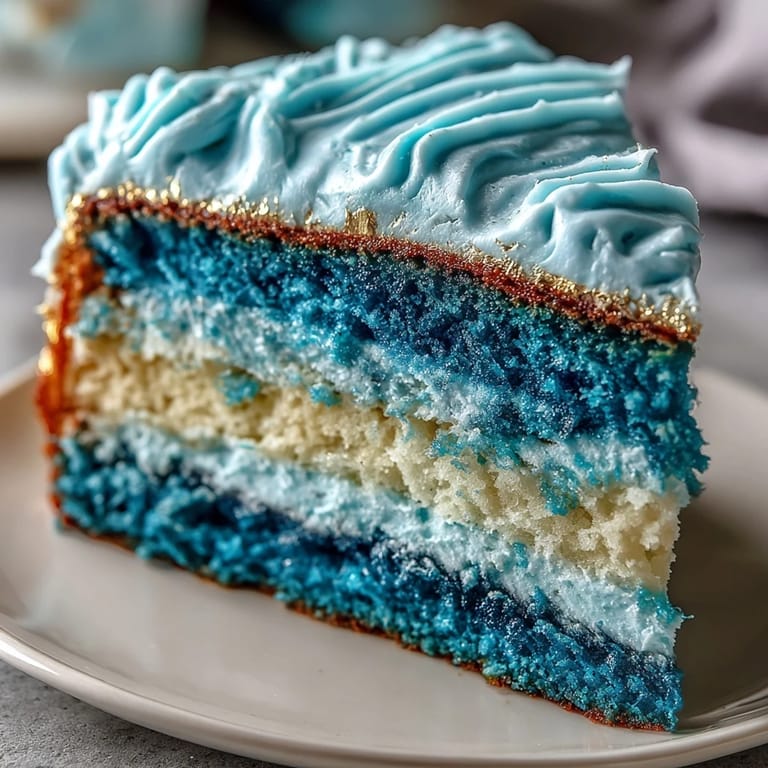
Shaping a Stunning Ombre Effect
With ombre cakes, patience is your best friend. I found gently blending colored buttercream gives a much more polished gradient, but don't stress if your hand isn't perfect—the colors will catch light beautifully. Layering from darkest to lightest blue evokes night sky vibes, which feels instantly celebratory. Try viewing each layer from all angles before stacking to ensure your gradient is strong. If you mess up, just keep going—the final coat hides most small flaws.
Gold Accents That Glow
Working with edible gold leaf took some trial and error in my kitchen. The leaf is feather-light and sticks everywhere but the cake unless handled gently and with dry tools. Painting gold dust with a brush adds flexibility for streaks and edges, and a little goes a long way. Always double-check that your gold decorations are edible and safe—it’s easy to get carried away with sparkle. If berry decorations are added, gold accents pop even more.
Celebration Layer Variations
Add more layers for extra drama or adjust the blue shades for your graduate's favorite colors. For bigger gatherings, doubling the recipe lets everyone have a generous slice. Chocolate stars or fresh berries offer an additional pop of color and flavor—just space them out evenly. Cake toppers give flair and personal meaning, whether it's a mini diploma or a star. Remember:
- If vanilla buttercream gets too soft, chill it briefly before piping details.
- Layers can be baked and wrapped ahead, saving stress on party day.
- Always check the edible status of food coloring and gold before decorating.
 Save
Save A celebratory cake brings everyone together, and a little shimmer goes a long way. Enjoy the process, and let each step be part of the occasion—blue fingers included.
Recipe Q&A
- → How is the ombre effect achieved?
By dividing batter and tinting each portion with different blue shades, then baking and stacking for a gradient look.
- → What are the essential tools needed?
You’ll need three cake pans, an electric mixer, mixing bowls, offset spatula, parchment paper, and optionally a turntable.
- → How is gold decoration applied?
Edible gold leaf or gold dust—mixed with clear alcohol—is brushed in streaks or applied to edges for a luxe accent.
- → Can the cake accommodate more layers?
Yes, for a dramatic ombre effect, prepare four or five cake layers with increasing blue intensities.
- → What is the average serving yield?
This cake produces about 12 generous servings, perfect for small gatherings or graduation parties.
- → Is the cake vegetarian?
Yes, the cake’s ingredients are suitable for a vegetarian diet—no meat or gelatin products are included.