 Save
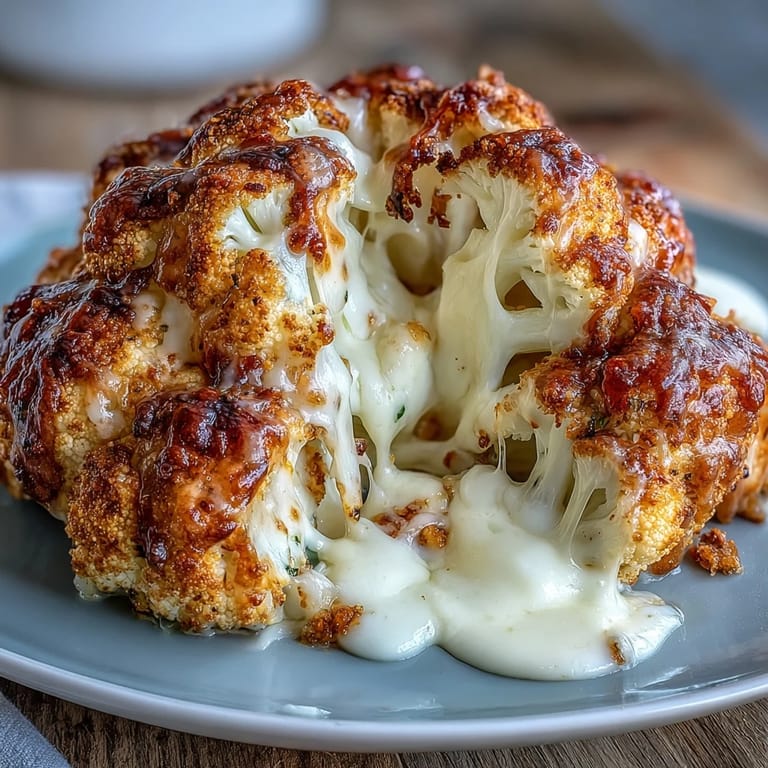
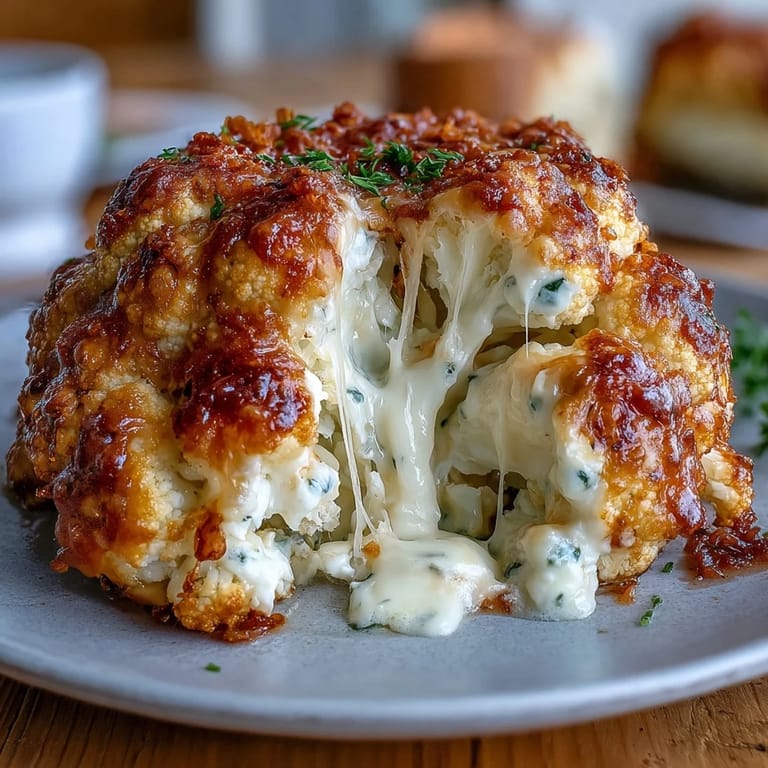
Save There's something about a whole roasted cauliflower that stops conversation mid-sentence. I wasn't planning to make this the night my neighbor mentioned she'd gone vegetarian—I was actually standing in the produce section looking at half a dozen sad recipe ideas when I spotted this massive, perfect head of cauliflower sitting there like a vegetable sculpture waiting to be transformed. By the time I got home, I'd already imagined it golden and stuffed, and what could have been a compromise dish turned into something that made everyone at the table lean forward with actual curiosity.
The first time I made this for a dinner party, I was genuinely nervous about the presentation, but then my friend who eats meat said she forgot halfway through that she was eating vegetables. That's when I understood this dish had shifted from just trying to accommodate different diets into making something so inherently delicious that the vegetarian part became almost beside the point—though honestly, that's when vegetarian cooking gets really interesting.
Ingredients
- 1 large whole cauliflower (about 1 kg), leaves and stem trimmed but intact: This is your canvas—look for one that's dense and pale, not bruised or yellowed, and keep that natural crown shape because it matters for presentation and even cooking.
- 1 tbsp olive oil: A drizzle just before roasting helps everything turn golden and keeps the outside from drying out while the inside gets tender.
- ½ tsp salt and ¼ tsp black pepper: Seasoning the outside is easy to forget but makes a real difference in every bite.
- 150 g cream cheese, softened: The softness matters—if it's cold from the fridge, it won't blend smoothly into the filling and you'll end up with lumpy spots.
- 100 g shredded mozzarella cheese: This melts beautifully and creates that creamy texture; low-moisture is actually better here so the filling stays cohesive rather than watery.
- 50 g grated Parmesan cheese: Non-negotiable for the umami depth and slight sharpness that stops the filling from tasting one-dimensional.
- 2 tbsp chopped fresh chives and 1 garlic clove, minced: Fresh aromatics brighten everything; dried chives won't give you that same pop of flavor.
- ½ tsp smoked paprika and ¼ tsp ground nutmeg: These quiet spices create complexity that makes people guess what they're tasting but never quite place it.
- 1 tbsp milk: This loosens the filling just enough so it spreads into the cauliflower without resistance.
- 50 g shredded cheddar cheese and 2 tbsp breadcrumbs: Together these toast into a golden, crunchy crown that adds textural contrast to the creamy inside.
- 1 tbsp melted butter: Tosses everything together so the topping adheres and colors evenly.
Tired of Takeout? 🥡
Get 10 meals you can make faster than delivery arrives. Seriously.
One email. No spam. Unsubscribe anytime.
Instructions
- Get your oven ready:
- Preheat to 200°C (400°F) and line your baking tray with parchment paper—this prevents sticking and makes cleanup about a thousand times easier.
- Trim the cauliflower properly:
- Remove the outer leaves and trim the base flat so it sits stable on the tray without rocking, but keep those florets tight and intact because they're what you'll stuff later.
- Blanch it just enough:
- Bring salted water to a boil and submerge the whole head for 8–10 minutes—you want it just tender enough to accept the filling but still holding its shape with some structure left. When you poke the base with a knife, it should feel slightly soft but not mushy.
- Make the cheese mixture smooth:
- Combine softened cream cheese, mozzarella, Parmesan, chives, garlic, paprika, nutmeg, and milk in a bowl and stir until completely uniform with no lumps. This is worth doing carefully because lumpy filling won't distribute evenly.
- Stuff with intention:
- Using a small sharp knife, carefully carve into the base and between the florets to create little pockets for the cheese, then press the mixture in with a spoon or your fingers—don't be timid, it won't break. Work from the center outward and make sure you've filled all the hidden spaces, not just the visible top.
- Season and coat the outside:
- Brush the whole cauliflower with olive oil and sprinkle generously with salt and pepper, then mix the cheddar cheese with breadcrumbs and melted butter and scatter it over the top. This topping is what creates the golden, crispy exterior.
- Roast until golden:
- Bake for 40–45 minutes until the cauliflower is tender when pierced and the cheese on top has turned golden brown with some spots just barely darkening. You'll know it's done when the cheese is bubbling slightly at the edges.
- Rest and serve:
- Let it sit for 5 minutes so everything sets slightly, then slice into wedges like you would a cake and serve immediately while the cheese is still creamy inside.
 Save
Save There's a moment right when you pull this out of the oven, when the steam rises and the whole kitchen fills with this incredible smell of melted cheese and roasted cauliflower, that this dish becomes something more than the sum of its parts. It transforms from ingredients into an experience, into something people gather around and actually slow down for.
Why Whole Cauliflower Instead of Florets
When you roast cauliflower pieces, they get crispy and interesting, but they lack drama. A whole head sitting in the center of a plate tells a story and makes people feel like they're eating something special—it's the same reason a whole fish on a platter feels more celebratory than filets. Plus, the stem and inner florets stay protected and tender inside while the outer parts turn golden, creating this beautiful contrast between creamy center and crispy edges that just doesn't happen with individual pieces.
Adapting the Filling
The cheese base here is pretty solid, but it's also a forgiving canvas if you want to make it your own. I've added sun-dried tomatoes on days when I wanted something brighter, sautéed mushrooms when I wanted earthiness, or even crispy pancetta if someone vegetarian wasn't coming over—just don't go wild with additions or you'll dilute the flavors. Think of it like seasoning: additions should enhance, not compete with the cauliflower and cheese.
Serving and Storage Wisdom
This comes together best served warm and fresh from the oven, but I've also made it a few hours ahead and reheated gently, which works fine though the crust isn't quite as crispy. Leftovers keep covered in the fridge for a couple of days and actually taste interesting as a cold salad the next day, shredded over greens with a squeeze of lemon. Store it in an airtight container and don't let it sit at room temperature for more than an hour or so.
- Serve alongside a crisp green salad or roasted root vegetables to balance the richness of the cheese.
- A squeeze of fresh lemon juice over the wedges just before eating brightens everything without overpowering.
- This feeds four generously as a main course or six comfortably as a showstopping side.
 Save
Save This dish arrived in my kitchen as a solution to a dinner party problem and stayed because it turned out to be genuinely delicious and beautiful. Every time I make it now, it reminds me that sometimes the best recipes are the ones that start as a challenge rather than a plan.
Recipe Q&A
- → Can I prepare this ahead of time?
Yes, you can par-boil the cauliflower and prepare the cheese filling up to a day in advance. Store them separately in the refrigerator. When ready to serve, stuff and bake as directed, adding a few extra minutes if cooking from cold.
- → What other cheeses work well in the filling?
Gruyère adds a lovely nutty flavor, while fontina provides excellent meltability. For a sharper taste, try adding some aged cheddar or a touch of blue cheese. Just keep the total cheese quantity similar for the best texture.
- → How do I know when the cauliflower is done?
The cauliflower is ready when it's deeply golden on top and the cheese is bubbling. Insert a knife into the center—it should slide through easily with no resistance. The florets should be tender but still hold their shape when sliced.
- → Can I make this dairy-free?
Use vegan cream cheese and shredded dairy-free cheese alternatives. Nutritional yeast can add the savory depth that Parmesan typically provides. The texture may differ slightly, but the concept works well with plant-based substitutions.
- → What should I serve with this?
A crisp green salad with acidic vinaigrette cuts through the richness beautifully. Roasted vegetables, particularly root vegetables or Brussels sprouts, complement the flavors. For a heartier meal, serve alongside crusty bread to soak up any melting cheese.